QUICKREF(DOCS) Optical Printer Control Systems QUICKREF(DOCS)
NAME
quickref - OPCS quick reference for camera operators
-------------------------------------------------------------------------
OPCS QUICK REFERENCE
-------------------------------------------------------------------------
*** STANDARD PROCEDURES **********************************************
FILM MOVEMENTS
--------------
There are two things to remember about the movements that are typical
when the OPCS system is idle:
1) The projectors show the SEATED IMAGE that's ABOUT TO BE SHOT
2) The camera is UNSEATED with the shutter closed
This way, you can look through the viewer and see the pinned, seated,
in-focus projector image that is about to be shot.
Unexposed film in the camera should be unseated, the camera shutter
being closed and not exposing film.
ORDER OF OPERATION
------------------
It is important to be familiar with the order of how the system
executes shooting operations:
>> 1) Motors seek positions FIRST. (for feeds, fades, dissolves)
>> 2) Camera exposes film SECOND.
>> 3) Projectors advance THIRD.
>> 4) Wedge/filter wheels are moved LAST. (autofilt)
If a fade, feed or dissolve is pending, these will move to positions
first.
If the camera is told to shoot, it will shoot AFTER feed/fade/dx's
have moved to position.
After the camera exposes the image in the projector gate(s), the
projector(s) advance to their new positions.
>> Before a step print, remember that the image in the projector's
>> gate is ABOUT TO BE SHOT. The camera always shoots first, and
>> the projectors advance after.
If there are any pending autofilt commands, these will move LAST.
This way, before a wedge, you are looking at a projector image through
the filter wheel position that has no filter in it, making it easier
to look through the viewer before shooting a wedge.
ALLSTOP
-------
The allstop key stops running motors at the nearest frame, without
affecting exposure, and prompts for ABORT or CONTINUE:
>> CONTINUE: The shot continues shooting as if nothing happened.
>> ABORT: Shooting stops, giving you a new command prompt.
WINDOFF WITH SHUTTER CLOSED
---------------------------
If someone has setup 'seekcap yes' in your opcsdefs.opc file, the
following will cap the shutter and run off the frames at the camera's
slewing speed, and then return the fader to its previous position:
seek 100 # caps fader, runs off 100 frms on camera at
# slew speed, and returns fader to previous
# position.
This is the equivalent, more obvious way, but does not use the 'slew'
speed for the camera:
cls cam 100 opn # Close fader, wind cam 100x, open fader
STARTING A NEW SHOT
-------------------
Before starting a shot, you will probably want to reset your counters,
roll off some black on the camera, and send the projectors out to their
starting frames to prep for the first shot. Here's an actual typical
example as typed in by a camera operator:
load # operator loads camera & projectors
res 0 0 0 # resets all counters to zero
seek >120 >120 >100 # send projectors to start, winds off
# 100 frames of black on camera.
rat 1 1 1 spd .25 # Setup a default ratio and camera speed.
opn # Make sure shutter is open, and that no
# fades or dissolves are pending.
The above commands can be put into a file, since it is done each time
the operator starts a shot. See RUNCMD(OPCSDEFS) for defining new
commands, and RUN(OPCS) for making and executing scripts. An example
of making the above into a command would be:
1. Add the following to your OPCSDEFS.OPC file:
runcmd newshot newshot.run 2
2. Enter 'ldefs opcsdefs.opc' to make sure the RUNCMD takes effect.
3. Make a file called NEWSHOT.RUN with the following commands:
load
res 0 0 0
seek $1 $2 >100
rat 1 1 1 spd .25 opn
You should now be able to type the following at the OPCS prompt, which
will automatically run the LOAD command, reset counters, run the projectors
out to their starting frames, etc:
newshot >120 >120
HOLDS
-----
To hold on a frame currently in the projector's gate, use the CAM command.
Note you can specify frames, feet/frames, or absolute frame positions:
cam 12 # run camera 12 frames
cam 4'2 # run camera 4 feet 2 frames
cam >12 # run camera TO frame 12 on the counter
cam >4'2 # run camera TO 4 feet 2 frames on the counter
STRAIGHT PRINTS
---------------
To do a straight print, you can do it the slow way, or the fast and
efficient way...
do 12 cam 1 pro 1 # SLOW WAY: straight print 12x
do 12 cam 1 pro -1 # SLOW WAY: straight reverse print 12x
rat 1 1 rep 12 # FAST WAY: straight print 12x
rat 1 -1 rep 12 # FAST WAY: straight reverse print 12x
STEP PRINTS
-----------
To do a step print of any kind, it is recommended you use RAT and REP:
rat 2 1 rep 12 # FAST MOTION: 12x step print of every other
# projector frame
rat 1 2 rep 6 # SLOW MOTION: 12x step print on twos
# Note REP 6 because camera shoots 2x each time
rat -1 1 rep 12 # REVERSE MOTION: 12x reverse print
CYCLES
------
Sometimes it is desirable to cycle projector frames rather than do a
simple hold. Here is a back and forth cycle (1,2,3,2,1,2...):
do 12 rat 1 1 rep 3 pro -1 rat -1 1 rep 2
Here is a cycle of selected projector frames (3,6,8,6,3...):
do 12 pro >3 cam 1 pro >6 cam 1 pro >8 cam 1 pro >6 cam 1
FADES/DISSOLVES
---------------
1) fdi 12 cam 12
2) rat 1 1 dxo 12 rep 12
3) do 12 dxo 4 cam 4 seek 8 -4 dxi 4 cam 4
^These commands repeat 12 times from left to right.
The first example sets up and shoots a 12x fade-in in on a still
projector image.
The second example sets up and shoots a 12x dissolve out of a
moving projector image.
The last example does (12) 4-frame cross dissolves on every 8th
projector image, having the effect of 'weaving' still frames from
an otherwise slow-motion moving projector image. Here's a break
down of the command:
do 12 dxo 4 cam 4 seek 8 -4 dxi 4 cam 4
----- ----------- --------- -----------
| | | |
| | | Shoot 4x dissolve in
| | Projector advances 8, camera backwinds 8.
| | (note: fader is closed after DXO 4 CAM 4
| | finished executing, so it's OK to backwind)
| Shoot 4x dissolve out.
Repeat all commands to the right 12 times. One execution would do
a single cross dissolve. 'do 12' will do 12 cross dissolves.
EXPOSURE WEDGES
---------------
You can use the SPD command to easily do exposure wedges.
To do a wedge the hard way, you can make a small script out of
the following commands:
spd .20 cam 1
spd .30 cam 1
spd .40 cam 1
spd .50 cam 1
spd .60 cam 1
spd .70 cam 1
spd .80 cam 1
spd .90 cam 1
spd 1.0 cam 1
This shoots a 9 frame wedge of the camera speeds between .20 and 1.0
at .10 increments.
There is a shorthand way to achieve the same, using the 'relative
offset' feature in the SPD command:
spd .20 do 9 cam 1 spd +.10
NOTE: When done executing, the current speed speed will be left at 1.1,
even though it won't have been shot as part of the wedge.
FILTER WEDGES
-------------
If you have a filter wheel, you can automate wedging the filter
wheel using the AUTOFILT command.
For instance, the most efficient way to shoot a simple 20x wedge
on the filter wheel:
autofilt on cam 20
Or, in long hand, and somewhat slower to shoot:
home autofilt # home the filter wheel
do 20 cam 1 go h 100 # shoot 20x, filter +100 pulses each frm
COMBINATION WEDGE
-----------------
To shoot a combination exposure and filter wedge, you can do the
following to wedge both the exposure (1.0 thru 0.2 on .10 increments)
and the full 20x on the filter wheel:
spd 1.0 do 8 autofilt on cam 20 spd -.1
To break this down:
spd 1.0 - start the exposure speed at 1.0
do 8 - repeat the following commands 8 times
autofilt on - home the filter wheel, and enable auto-wedging
cam 20 - shoot 20x; filter wheel will move each frame
spd -.1 - subtract .1 from exposure speed
*** AUTOMATED SCRIPTS ***************************************************
You can setup scripts to do several operations automatically.
Experienced operators can setup a complicated printing operation
as a script file, so another operator can shoot it without knowing
the intricate details involved.
This also lets you re-run the script later if a reshoot is necessary.
CREATING SCRIPT FILES
---------------------
You can either use a text editor to create a script of OPCS commands,
or you can use the LOG command to have the software save commands to a
file as you execute them. If you use the LOG command to create a file,
you can use a text editor to make corrections or modifications afterwards.
log myfile.log # Start a command log to the file 'myfile.log'
# Commands executed in the OPCS software from
# here on will be saved to the file.
log off # This closes the logfile, and turns off
# command logging. Note: if you quit the
# OPCS software, it will automatically close
# and save any log files that were in progress.
EXECUTING SCRIPTS
-----------------
Once you have a script file, you can run it by executing:
run myfile.log # run the commands in the script
While the script runs, the filename is shown in the runbar, along
with the line number its currently executing.
You may find that at a certain point, you want the script to pause
so the operator can change filters, or do some other manual operation
before continuing. Use the PSE command for this. Consider this excerpt
from a script:
fdo 12 cam 12 cam 24 # fade out and hold black
seek >1878 - # find Scene 4A
# HEY YOU! Wake up, and insert the ND 60 filter for Scene 4A
@ pse
rat 2 1 rep 400 # fast motion of guy running
When this script executes, the 'HEY YOU' comment will appear on the
screen, and PSE will stop with a prompt:
# HEY YOU! Wake up, and insert the ND 60 filter for Scene 4A
* FILE PAUSE *
RETURN to continue, SPACEBAR to abort: _
...The operator can then insert the filter, and continue the shot.
While a script is running, the operator can hit ALLSTOP, which will
pause the script wherever it happens to be at the time, allowing the
option of continuing or aborting.
The operator may decide to ABORT the running script to execute other
commands before continuing or to fix a problem. When a script is aborted,
the software displays the line number at which the script was stopped.
To start the script up from the same place, the operator can supply
the 'stopped at' line number to the RUN command:
STOPPED AT LINE 33 IN 'MYSCRIPT.RUN' # operator aborts script
run myscript.run 33 # continue script where left off
See the man page on 'run' for more on this.
SCRIPT TIPS
-----------
To use scripts effectively, here are some tips:
COMMENTS
Scripts are great when you write them, but you'll never
remember what they do days later just by looking at them.
'What the hell did I set this up to do?' comes to mind.
PUT COMMENTS IN YOUR SCRIPTS so you (and others) know
what it does. A quick one liner comment at the top of
your script at least. Use brief comments to describe
lines or blocks of lines that you think might need
desciption.
AVOID LONG LINES
Cramming lots of commands needlessly into long lines
is best avoided when writing scripts. If nothing else,
to make it easy to see what's going on. Also, it makes
it easier to restart a script at a particular line.
There's nothing wrong with putting several operations on
one line, if they're all related.
MODULARIZE: SMALL SCRIPTS
It's often a good idea to break a long shot into separate
scripts, and then make a 'main script' that calls all the
smaller ones.
Also, if you find yourself copying blocks of commands over
and over into different places in a file, it's probably better
to put these commands into a script, and then call that script.
This avoids typos, and can simplify things greatly.
KEEP ORIGINALS
If you are going to use a script from another scene,
make a copy, and then modify the copy. Never modify your
original script if it was used for a shot that may need a
reshoot in the future.
SAVE YOUR FILES ON FLOPPIES
Hard disks are great, but when they crash, you can lose
the whole works, unless you have backups on floppies.
Learn how to format floppies, and copy files to/from them.
Keep related shots together on one floppy. You can even make
subdirectories on floppies to keep shots separate.
STANDARDIZE RECORD KEEPING
Come up with some sort of standard for keeping track of files
for your shots. Since filenames can have up to 8 letters (plus
3 letter extensions), you dont have much flexibility, and can
end up with cryptic insanity such as:
ILM057T2.RUN # insane file name
| | |
| | 'Take 2'
| Shot or scene number
3 letter job name
A better technique is to use subdirectories, allowing you the
freedom to use any filenames you want (since people tend to make
their own names for files anyway):
ILM\SHOT05A\DXTEST.RUN # first take
ILM\SHOT05A\DXTEST2.RUN # second take
ILM\SHOT05A\FINAL.RUN # final shot used
| | |
| | Any filenames appropriate
| Shot directory
Job directory
*** MOTION CONTROL MOVES ***********************************************
The OPCS software supports motion control to the extent that you can
either specify moving motors with the GO(OPCS) command, or by
an ascii file containing columns of numbers that represent absolute
positions using the FEED(OPCS) command. Channels can be moved by
hand and 'key frames' can be created using the JOG(OPCS) command.
OPCS does not have any curve editors or graphing programs built into
it. However, OPCS does come with some external commands that help you
create FEED(OPCS) files. These external commands can be made to look
like they're part of OPCS using RUNCMD(OPCSDEFS) and DOSCMD(OPCSDEFS).
You can also generate FEED(OPCS) files by either use existing 3rd party
software (like Kuper) or your own custom C programs. FEED files are
simple ascii files, which you can even create using a text editor.
OPCS does *NOT* support streaking. See below, STREAKING.
PANS
----
Pans are relatively straight forward. They usually involve one or
more axes that simply move to a position before shooting. For the
examples below, let's assume pan is on motor channel 'e'.
SIMPLE LINEAR EXAMPLE:
A simple 10 frame linear pan, 100 steps per frame:
do 10 rep 1 go e 100
That will shoot 10 frames of a moving projector image, moving the
pan channel 'e' 100 steps each frame.
To pan in the opposite direction, use a negative number, e.g.
"go e -100".
After shooting, to return the pan channel to zero, you can use:
go e >0 -- send the 'e' channel to zero
For a fancier pan with ease-in and ease-out, use a combination
of the EASE(DOCS), GR(DOCS), and FEED(OPCS) commands, which use
a 'position file' to handle the move.
EASE IN/OUT EXAMPLE:
Create and shoot a 60 frame pan from 0 to 4000 steps, with a
10 frame ease-in, 20 frame ease-out:
! sleep 0 > pan60.pos - Create empty position file
ease pan60.pos e 1 60 0 4000 10 20 - Create the move
feed e pan60.pos - Setup to use the move
rep 60 - Shoot the move
Breaking that down:
First we create an empty position file called 'pan60.pos',
using the DOS 'sleep 0' command:
! sleep 0 > pan60.pos
This ensures there's no positions left over in the file.
Then we create the move with the EASE(DOCS) command:
ease pan60.pos e 1 60 0 4000 10 20
---- --------- - ---- ------ -- --
| | | | | | |
| | | | | | Ease out #frames
| | | | | |
| | | | | Ease in #frames
| | | | |
| | | | Start and End position for pan
| | | |
| | | Frame range (first number always 1)
| | |
| | Channel to move (e=pan channel)
| |
| Name of file to save your ease to
|
'ease' command
..that creates positions in the file 'pan60.pos', which will
be a text file of the positions, one per line.
The position file will be clear text, so it can optionally
be reviewed with e.g. the DOS 'edit' command, e.g.
edit pan60.pos
..or you can graph the positions using the GR(DOCS) command:
gr pan60.pos e 1 60
-- --------- - ----
| | | |
| | | Frame range
| | Channel to graph
| Your position filename
'gr' command
This will show your move as a graph, screenshot:
 ..or an ASCII art representation:
.....o
....```` |
.'' |
.` |
'| |
' | |
' | |
' | |
' | |
' | |
' | |
' | |
.' | |
..'' | | |
o...''' | | |
|<--------->|<------>|<<-------------->|
EaseIn Linear EaseOut
Section Section Section
(10x) (30x) (20x)
To quit out of the graphing program, hit "ESC" or "q".
Once the move is created, use the FEED(OPCS) command to set up OPCS
to start feeding the positions from the file:
feed e pan60.pos
---- - ---------
| | |
| | Position file
| Channel(s) to feed positions from
The 'feed' command
From then on, any commands that shoot the camera will move the pan
after each camera frame fires until all 60 frames of the move are shot.
Then the file will close itself after the last position.
To simply shoot all 60 frames of the move, you can just use:
rep 60
..and for every camera frame, the new positions will be fed from
the file until all 60 frames are shot.
Any of the commands that move the camera can be used, including
CAM(OPCS), REP(OPCS), etc. And you can mix in fades or dissolves
as desired.
To cancel an in-progress feed, you can use 'feed off'.
For multi-axis moves, use the same technique to build up a single
position file, one channel at a time. Then include all the channels
together in the 'feed' command for them to all move together.
EXAMPLE: Setup and shoot a 60 frame combined pan and tilt, using the
'e' and 'f' channels respectively, with 10x ease-in, 20x ease-out:
ease mymove.pos e 1 60 0 4000 10 20
ease mymove.pos f 1 60 -1000 3400 10 20
feed ef mymove.pos
rep 60
Here we don't show using the GR(DOCS) command to graph the move,
but you can do so just to check each 'ease' command.
ZOOMS
-----
Zooms are somewhat more complicated than simple pans by two peculiarities:
1) Follow focus
2) Exposure compensation
Regarding #1, focus is usually achieved by moving the lens, and having
the camera move relative to it. See INTERP(OPCSDEFS) for how to configure
auto-focus.
For manual control of focus, you can run the focus channel separately
using either FEED(OPCS) or GO(OPCS). Simply specifying the focus channel
for movement will override auto-focus.
Regarding #2, as you zoom into the film frame, light is lost. This is
because the same amount of light for 1:1 spreads out the more you zoom
in. Exposure speed can compensate for the lost light by slowing the
exposure.
Exposure can either be auto-compensated with SPDINTERP(OPCSDEFS) or
by manual specification in a FEED(OPCS) file by specifying a column
of numbers to the special channel 'x'.
Other than that, zooms are the same as pans; create the move with EASE(DOCS)
and set it up to shoot with FEED(OPCS).
STREAKING
---------
OPCS does *NOT* support streaking. It never will. This is advertised
in the FAQ, and is adamantly underlined.
If you want streaking capabilities, that is a whole other bag of worms
which is best handled by dedicated motion control software, such as that
supplied by Kuper Controls. OPCS does not purport to be a full on motion
control system, and streaking is where the line is drawn.
*** MISCELLANEOUS TIPS *************************************************
NEW COMMAND LINE EDITING (K2.00 AND UP)
---------------------------------------
In OPCS version K2.00 and higher, line editing and a command history
have been added to make it easier to retype and edit commands.
More like a text editor or word processor, you can interactively
edit commands, using LEFT/RIGHT arrow to move back into a long line
to make changes, Delete characters, insert characters, etc:
Up Arrow -- previous line in command history (^P)
Dn Arrow -- next line in command history (^N)
Lt Arrow -- move reverse one char on current line (^B)
Rt Arrow -- move forward one char on current line (^F)
Backspace -- backspace and delete (^H)
Delete -- delete character (^D)
Home -- move to start of current line (^A)
End -- move to end of current line (^E)
Ctrl-Home -- jump to top of command history
Ctrl-End -- jump to bottom of command history (current line)
Ctrl-Left -- word left
Ctrl-Right -- word right
^K -- clear to end of line
^U -- clear current line (hit again to 'undo')
^V -- enter next character literally
ESC -- clear current line (hit again to 'undo')
F3 -- re-type last command
F4 -- re-run last command (F3 + Enter)
OPERATOR PREFERENCES
--------------------
The following OPCSDEFS.OPC commands can be set up to the
operator's taste. You will not 'mess anything up' if you
change these commands, they are only for the operator to
play with, and will not effect motors, running speeds, etc.
bigcounters [on or off]
If you prefer the large screen counters set 'bigcounters on'.
If you would rather have more screen space to see commands
and files, you may want to try 'bigcounters off'.
leadingzeroes [on or off]
If you dont like all the leading zeroes in the counter
displays, you can turn them off with 'leadingzeroes off'.
pro2display [on or off]
If you have a single headed printer, you will probably
prefer not to have the unwanted 'projector 2' counter on
the screen. You can turn it off by setting 'pro2display off'.
However, if you have an aerial head, you will want this
setting 'on'.
If you want to change these values permanently, alter the
OPCSDEFS.OPC file. If you just want to try them out with out
having them be a permanent change, you can use the LDEFS command
to read commands from the keyboard:
ldefs con # type this at the OPCS prompt
bigcounters off # try a different setting
^Z # (type control-z and hit return)
# Back in OPCS, big counters off.
SPECIAL COMMAND USAGE: THE CALCULATOR
-------------------------------------
At any time in the OPCS software, you can do calculator entries.
Simply form a math expression that is encapsulated in parentheses.
Do this on an empty OPCS command line. When you hit return, the answer
will be displayed:
(20*(12+8+9+54)) # type this in to add up your hours..
1660.0000 # Result displayed
If you are in DOS, there is a 'calc' command that will let you do
the same thing:
C:\USR\OPCS>calc # run CALC from DOS
(34+sqrt(47)) # type in a math expression
40.855655 # Result
(3+4+5) # keep entering commands..
12.000000 # Result
^C # Type CONTROL-C to return to DOS
C:\USR\OPCS> # (back in DOS)
These are the math functions allowed currently for math expressions:
/*** MATH FUNCTIONS ***/
sqrt() log() exp()
sin() cos() tan()
asin() acos() atan()
radians() degrees()
/*** NUMERIC EXPRESSIONS ***/
-12 # negative 12
+34 # positive 34
0x3ff # hex representation for 1023 decimal
GETTING HELP
------------
Use the MAN command to get general and specific documentation.
The '-k' flag tells MAN to be general, and look for anything related
to the argument that follows. In the following examples, case is
important (i.e. upper/lower case):
*** General Documentation ****************************************
man -k OPCS: # list OPCS commands
man -k OPCSDEFS: # list opcsdefs commands
man -k OPCS # list OPCS related commands
man -k # list everything MAN knows about
Any if the above will display a long list of commands, followed by
simple one line descriptions of each command. With this list, you
can then zero in on any of the commands to get more complete
documentation...
*** Detailed Documentation ***************************************
man cam # specific docs on the CAM command
Often there are 'non-standard' utilities in the \bin directory. These
can USUALLY be documented with the 'man' command. (e.g. HOME.EXE is
documented with 'man home') These utilities are useful, and should be
used by anyone willing to learn them.
*** SHOOTING ************************************************************
PUSH BUTTON SHOOTING - THE 'KEY' COMMAND
----------------------------------------
The 'KEY' command allows the operator to use buttons to control the
camera, projector and fader much like the mechanical printer controls
that many people are used to.
The function keys across the top of the keyboard are windoff buttons.
Number keys (below the function keys) control ratio shooting, counter
resets, fade/dissolve setups, fader open/close, etc.
..or an ASCII art representation:
.....o
....```` |
.'' |
.` |
'| |
' | |
' | |
' | |
' | |
' | |
' | |
' | |
.' | |
..'' | | |
o...''' | | |
|<--------->|<------>|<<-------------->|
EaseIn Linear EaseOut
Section Section Section
(10x) (30x) (20x)
To quit out of the graphing program, hit "ESC" or "q".
Once the move is created, use the FEED(OPCS) command to set up OPCS
to start feeding the positions from the file:
feed e pan60.pos
---- - ---------
| | |
| | Position file
| Channel(s) to feed positions from
The 'feed' command
From then on, any commands that shoot the camera will move the pan
after each camera frame fires until all 60 frames of the move are shot.
Then the file will close itself after the last position.
To simply shoot all 60 frames of the move, you can just use:
rep 60
..and for every camera frame, the new positions will be fed from
the file until all 60 frames are shot.
Any of the commands that move the camera can be used, including
CAM(OPCS), REP(OPCS), etc. And you can mix in fades or dissolves
as desired.
To cancel an in-progress feed, you can use 'feed off'.
For multi-axis moves, use the same technique to build up a single
position file, one channel at a time. Then include all the channels
together in the 'feed' command for them to all move together.
EXAMPLE: Setup and shoot a 60 frame combined pan and tilt, using the
'e' and 'f' channels respectively, with 10x ease-in, 20x ease-out:
ease mymove.pos e 1 60 0 4000 10 20
ease mymove.pos f 1 60 -1000 3400 10 20
feed ef mymove.pos
rep 60
Here we don't show using the GR(DOCS) command to graph the move,
but you can do so just to check each 'ease' command.
ZOOMS
-----
Zooms are somewhat more complicated than simple pans by two peculiarities:
1) Follow focus
2) Exposure compensation
Regarding #1, focus is usually achieved by moving the lens, and having
the camera move relative to it. See INTERP(OPCSDEFS) for how to configure
auto-focus.
For manual control of focus, you can run the focus channel separately
using either FEED(OPCS) or GO(OPCS). Simply specifying the focus channel
for movement will override auto-focus.
Regarding #2, as you zoom into the film frame, light is lost. This is
because the same amount of light for 1:1 spreads out the more you zoom
in. Exposure speed can compensate for the lost light by slowing the
exposure.
Exposure can either be auto-compensated with SPDINTERP(OPCSDEFS) or
by manual specification in a FEED(OPCS) file by specifying a column
of numbers to the special channel 'x'.
Other than that, zooms are the same as pans; create the move with EASE(DOCS)
and set it up to shoot with FEED(OPCS).
STREAKING
---------
OPCS does *NOT* support streaking. It never will. This is advertised
in the FAQ, and is adamantly underlined.
If you want streaking capabilities, that is a whole other bag of worms
which is best handled by dedicated motion control software, such as that
supplied by Kuper Controls. OPCS does not purport to be a full on motion
control system, and streaking is where the line is drawn.
*** MISCELLANEOUS TIPS *************************************************
NEW COMMAND LINE EDITING (K2.00 AND UP)
---------------------------------------
In OPCS version K2.00 and higher, line editing and a command history
have been added to make it easier to retype and edit commands.
More like a text editor or word processor, you can interactively
edit commands, using LEFT/RIGHT arrow to move back into a long line
to make changes, Delete characters, insert characters, etc:
Up Arrow -- previous line in command history (^P)
Dn Arrow -- next line in command history (^N)
Lt Arrow -- move reverse one char on current line (^B)
Rt Arrow -- move forward one char on current line (^F)
Backspace -- backspace and delete (^H)
Delete -- delete character (^D)
Home -- move to start of current line (^A)
End -- move to end of current line (^E)
Ctrl-Home -- jump to top of command history
Ctrl-End -- jump to bottom of command history (current line)
Ctrl-Left -- word left
Ctrl-Right -- word right
^K -- clear to end of line
^U -- clear current line (hit again to 'undo')
^V -- enter next character literally
ESC -- clear current line (hit again to 'undo')
F3 -- re-type last command
F4 -- re-run last command (F3 + Enter)
OPERATOR PREFERENCES
--------------------
The following OPCSDEFS.OPC commands can be set up to the
operator's taste. You will not 'mess anything up' if you
change these commands, they are only for the operator to
play with, and will not effect motors, running speeds, etc.
bigcounters [on or off]
If you prefer the large screen counters set 'bigcounters on'.
If you would rather have more screen space to see commands
and files, you may want to try 'bigcounters off'.
leadingzeroes [on or off]
If you dont like all the leading zeroes in the counter
displays, you can turn them off with 'leadingzeroes off'.
pro2display [on or off]
If you have a single headed printer, you will probably
prefer not to have the unwanted 'projector 2' counter on
the screen. You can turn it off by setting 'pro2display off'.
However, if you have an aerial head, you will want this
setting 'on'.
If you want to change these values permanently, alter the
OPCSDEFS.OPC file. If you just want to try them out with out
having them be a permanent change, you can use the LDEFS command
to read commands from the keyboard:
ldefs con # type this at the OPCS prompt
bigcounters off # try a different setting
^Z # (type control-z and hit return)
# Back in OPCS, big counters off.
SPECIAL COMMAND USAGE: THE CALCULATOR
-------------------------------------
At any time in the OPCS software, you can do calculator entries.
Simply form a math expression that is encapsulated in parentheses.
Do this on an empty OPCS command line. When you hit return, the answer
will be displayed:
(20*(12+8+9+54)) # type this in to add up your hours..
1660.0000 # Result displayed
If you are in DOS, there is a 'calc' command that will let you do
the same thing:
C:\USR\OPCS>calc # run CALC from DOS
(34+sqrt(47)) # type in a math expression
40.855655 # Result
(3+4+5) # keep entering commands..
12.000000 # Result
^C # Type CONTROL-C to return to DOS
C:\USR\OPCS> # (back in DOS)
These are the math functions allowed currently for math expressions:
/*** MATH FUNCTIONS ***/
sqrt() log() exp()
sin() cos() tan()
asin() acos() atan()
radians() degrees()
/*** NUMERIC EXPRESSIONS ***/
-12 # negative 12
+34 # positive 34
0x3ff # hex representation for 1023 decimal
GETTING HELP
------------
Use the MAN command to get general and specific documentation.
The '-k' flag tells MAN to be general, and look for anything related
to the argument that follows. In the following examples, case is
important (i.e. upper/lower case):
*** General Documentation ****************************************
man -k OPCS: # list OPCS commands
man -k OPCSDEFS: # list opcsdefs commands
man -k OPCS # list OPCS related commands
man -k # list everything MAN knows about
Any if the above will display a long list of commands, followed by
simple one line descriptions of each command. With this list, you
can then zero in on any of the commands to get more complete
documentation...
*** Detailed Documentation ***************************************
man cam # specific docs on the CAM command
Often there are 'non-standard' utilities in the \bin directory. These
can USUALLY be documented with the 'man' command. (e.g. HOME.EXE is
documented with 'man home') These utilities are useful, and should be
used by anyone willing to learn them.
*** SHOOTING ************************************************************
PUSH BUTTON SHOOTING - THE 'KEY' COMMAND
----------------------------------------
The 'KEY' command allows the operator to use buttons to control the
camera, projector and fader much like the mechanical printer controls
that many people are used to.
The function keys across the top of the keyboard are windoff buttons.
Number keys (below the function keys) control ratio shooting, counter
resets, fade/dissolve setups, fader open/close, etc.
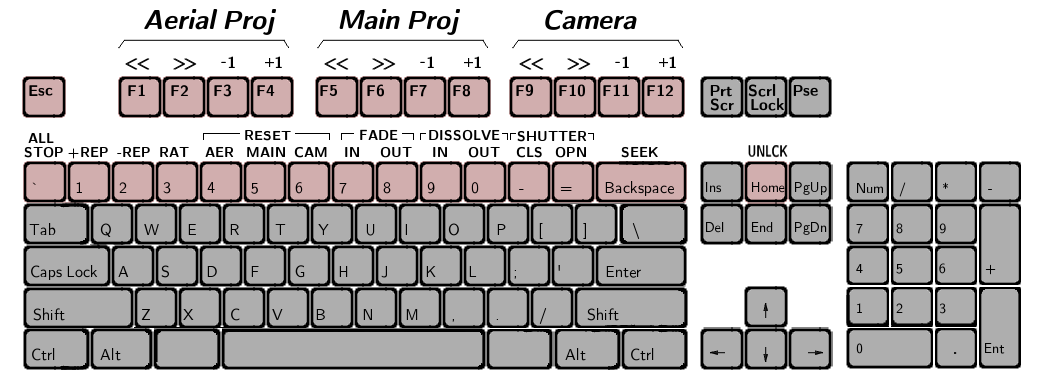 If you don't have a keyboard template which shows which keys do what,
refer to the man pages on KEY(OPCS), and make your own. It is best to
have some sort of template on the keyboard.
Hitting ESC or Q will exit the 'KEY' mode so you can execute any of the
other OPCS commands.
The following shows common operations the cameraman wants to do, showing
the keystrokes that do them. 'Operation' is the label on the keyboard
template, 'Key to hit' is the actual keyboard key to hit.
Only in cases where "Then type:" is specified, it is assumed you should
always hit ENTER after typing the specified values. [Space] is used to denote
hitting the spacebar.
COUNTERS
---------------------------
To reset the camera counter to zero:
Operation Key to hit
--------- ----------
---
RES CAM | 6 | Then type: 0 [Enter]
---
For the main projector, same thing, but hit '5'. For the aerial
projector, hit '4'.
To set the counters to other values, type the desired value.
To set the camera counter to 100:
Operation Key to hit
--------- ----------
---
RES CAM | 6 | Then type: 100 [Enter]
---
WINDOFF WITH SHUTTER CLOSED
---------------------------
The following shows how to cap the shutter, windoff some frames on
the camera, then open the shutter again:
Operation Key to hit
--------- ----------
---
CLS | = |
---
Then:
----
CAM FWD | F9 | (Camera runs while F9 pressed)
----
Then:
---
OPN | - |
---
Windoff 100 frames on the camera, shutter automatically caps:
Operation Key to hit
--------- ----------
-----------
SEEK | BACKSPACE | Then type: 100 [Enter]
-----------
Windoff camera out to frame #304, shutter automatically caps:
Operation Key to hit
--------- ----------
-----------
SEEK | BACKSPACE | Then type: >304 [Enter]
-----------
Send aerial to frame #200, main to #100, and windoff 50x on camera:
Operation Key to hit
--------- ----------
-----------
SEEK | BACKSPACE | Then type: >200 [Space] >100 [Space] 50 [Enter]
-----------
STRAIGHT PRINTS
---------------------------
For a 1:1 step print with ONLY main projector (single projector system):
Operation Key to hit
--------- ----------
---
RAT | 3 | Then type: 1 [Space] 1 [Enter]
---
Then:
---
REP+ | 1 |
---
..same thing, but on an aerial system:
Operation Key to hit
--------- ----------
---
RAT | 3 | Then type: 0 [Space] 1 [Space] 1 [Enter]
---
Then:
---
REP+ | 1 |
---
For a 1:1:1 step print on an aerial system:
Operation Key to hit
--------- ----------
---
RAT | 3 | Then type: 1 [Space] 1 [Space] 1 [Enter]
---
Then:
---
REP+ | 1 |
---
STEP PRINTS
---------------------------
For a 2:1 step print:
Operation Key to hit
--------- ----------
---
RAT | 3 | Then type: 2 [Space] 1 [Enter]
---
Then:
---
REP+ | 1 |
---
For a 2:2:1 step print:
---
RAT | 3 | Then type: 2 [Space] 2 [Space] 1 [Enter]
---
Then:
---
REP+ | 1 |
---
FADES/DISSOLVES
---------------------------
For a 24 frame fade in on a held projector frame:
Operation Key to hit
--------- ----------
---
FDI | 7 | Then type: 24 [Enter]
---
Then:
----
CAMERA FWD | F9 |
----
For a 24 frame fade in on a straight print, make sure your
ratio is currently 1:1 (See STRAIGHT PRINTS) then:
Operation Key to hit
--------- ----------
---
FDI | 7 | Then type: 24 [Enter]
---
Then:
---
REP+ | 1 |
---
(REVISION 3.00 OR LATER)
To set up a fade in, hit the FADE IN button, and enter the number of frames
for the fade. When you run the camera, the fade will take place. Fade outs
and dissolves are set up the same way. You can cancel a fade by hitting
the FADER OPEN or FADER CLOSE buttons.
NOVICE'S GUIDE TO DOS COMMANDS
------------------------------
Note that to run a DOS command, you should precede the command
with a '!' when you are in the OPCS software. Or, if you prefer,
you can set up more DOSCMD(OPCSDEFS) entries in your OPCSDEFS.OPC
file so you can type in certain DOS commands without the need for
using '!'.
*** Formatting Floppy Disks *****************************************
format a:
Be careful with the DOS 'format' command.. If you dont supply any
arguments to format, it will often default to formatting the
hard disk! An easy mistake to make.
*** Directory Listings **********************************************
The DIR command is how to get directory listings:
dir # list files in the current directory
dir *.run # list files that end in .run
dir m*.* # list all files that start with 'm'
dir ilm/scn4a/*.* # list all files in the ilm/scn4a directory
dir a: # list files on floppy drive
Most versions of DOS support sorting of file listings.
Dos 6.0 supports these:
dir /on # sort by name
dir /ox # sort by extension
dir /od # sort by date (oldest first)
dir /os # sort by size
See 'dir /?' for a list of all the options dir supports.
COPY FILES
----------
The copy command has two arguments: a source and a destination.
If the destination is not supplied, the current drive is assumed
to be the destination.
copy *.run a: # copy files ending in .run to floppy
copy a:*.run . # copy files ending in .run FROM floppy
copy myfile.pos save.pos # make a copy of myfile.pos to save.pos
DELETE FILES
------------
When you delete files, they don't come back, so BE CAREFUL.
Especially BE CAREFUL WHEN DOING WILDCARD DELETES!
del junk.pos # deletes 'junk.pos' from disk
del a:crap.jnk # deletes crap.jnk from floppy disk
del crap*.* # deletes files that start with 'crap'
del *.* # deletes ALL FILES - Watch out!
MAKING SUB DIRECTORIES
----------------------
mkdir fred # makes a subdir 'fred' in the current dir
mkdir fred\jobs # makes a subdir 'jobs' in 'fred'
mkdir a:save # makes a 'save' subdir on the floppy
CHANGING INTO/OUT OF SUBDIRECTORIES
-----------------------------------
cd fred # go into 'fred' directory
cd jobs # go into 'jobs' directory
cd .. # go back one to 'fred'
cd # tells you what directory you are in
REMOVING SUB DIRECTORIES
------------------------
del fred\job\*.* # clean out JOB directory of all files first
rmdir fred\job # removes JOB directory (FRED remains)
rmdir fred # removes FRED directory
SEARCHING FOR FILES
-------------------
The 'whereis' command will search the entire hard disk for filenames you supply
as an argument, and shows the full pathname to any matching files. Examples:
whereis opcsdefs.opc # searches for all OPCSDEFS.OPC files
whereis foo*.* # searches for all files starting with "foo"
HARD DISK BACKUPS
-----------------
You should definitely refer to your DOS manual for this one.
See the docs on BACKUP and RESTORE commands. But here are a
few examples:
HOW TO BACKUP THE C: DRIVE
--------------------------
mkdir a:\opcs
xcopy /s c:\opcs a:\opcs
HOW TO RESTORE THE C: DRIVE FROM BACKUPS
----------------------------------------
cd \
mkdir \opcs
xcopy /s a:\opcs c:\opcs a:
LOOKING AT TEXT FILES
---------------------
type myfile.pos # Type out myfile.pos in one blast
more myfile.pos # View the file a page at a time
HOW TO EDIT THE HIDDEN C:\MSDOS.SYS FILE
----------------------------------------
The MSDOS.SYS file lets you disable Windows 95/Windows 98 from starting,
so you can boot straight into DOS. But to edit the file, you have to turn
off its hidden system attributes, then turn them back on when done:
attrib -S -H -R c:\msdos.sys # Remove system/hidden/readonly
edit c:\msdos.sys # Edit file, make changes
attrib +S +H +R c:\msdos.sys # Restore system/hidden/readonly
The recommended contents of the MSDOS.SYS file to ensure only DOS boots
(and not Windows) for OPCS is:
;FORMAT
[Options]
BootGUI=0
Logo=0
BootDelay=0
OPCS BOOT INSTALL
This text describes the boot process for OPCS, when the machine
starts up. This assumes general familiarity with IBM PCs and
DOS terminology.
It is assumed you have:
o An IBM PC with ISA or EISA slots
o An RTMC card or A800 card plugged into one of the ISA slots
o 512K or more of system memory.
o A hard disk with MS-DOS 6.xx, Win95, or Win98 installed
o For Win95/Win98: configured to boot into DOS mode (BootGUI=0)
o AUTOEXEC.BAT and CONFIG.SYS configured as described below
CONFIG.SYS
----------
Your C:\CONFIG.SYS should at minimum have these (or similar) settings:
DEVICE=C:\WINDOWS\HIMEM.SYS
DEVICE=C:\WINDOWS\COMMAND\ANSI.SYS
DEVICE=C:\OPCS\BIN\OPCSBOLD.SYS
FILES=10
BUFFERS=20
HIMEM.SYS is optional but recommended.
ANSI.SYS is required but might be in a different directory.
Values for FILES/BUFFERS are minimum.
OPCSBOLD.SYS is required if 'nixie' counters are used.
AUTOEXEC.BAT
------------
Your C:\AUTOEXEC.BAT should have at minimum these settings:
set PATH=\OPCS\BIN;%PATH%
set MANPATH=C:/OPCS/MAN/MAP
..and at least one of the following drivers should be started,
depending on which stepper motor pulse generator card you have
installed in the machine's ISA slot:
A800DRV.COM - for the a800 card
RTMC48.COM - for the RTMC48 or Kuper Industrial card
MDRIVE.COM - for the RTMC16 card
If started with no command line flags, the drivers assume
the cards are using the default jumper settings (usually
baseaddr=300, IRQ=5).
If your jumper settings are different than the defaults, be sure
to specify the appropriate command line options that match your
card's jumper settings.
Invoke the driver with the "-help" flag to see the driver's command
line options, e.g.
a800drv -help
rtmc48 -help
mdrive -help
If a driver doesn't show a help screen, that driver ONLY supports
the default jumper settings.
For example, if your A800 card has default settings, you can just put:
a800drv
..in your AUTOEXEC.BAT.
If, however, your A800 card has the BaseAddr set to 340, instead
of the default 300, then you'd have to start the driver with:
a800drv -b340 -i5
| |
| IRQ5
BaseAddr 340
ORIGIN
Gregory Ercolano, Topanga, California 04/12/00
If you don't have a keyboard template which shows which keys do what,
refer to the man pages on KEY(OPCS), and make your own. It is best to
have some sort of template on the keyboard.
Hitting ESC or Q will exit the 'KEY' mode so you can execute any of the
other OPCS commands.
The following shows common operations the cameraman wants to do, showing
the keystrokes that do them. 'Operation' is the label on the keyboard
template, 'Key to hit' is the actual keyboard key to hit.
Only in cases where "Then type:" is specified, it is assumed you should
always hit ENTER after typing the specified values. [Space] is used to denote
hitting the spacebar.
COUNTERS
---------------------------
To reset the camera counter to zero:
Operation Key to hit
--------- ----------
---
RES CAM | 6 | Then type: 0 [Enter]
---
For the main projector, same thing, but hit '5'. For the aerial
projector, hit '4'.
To set the counters to other values, type the desired value.
To set the camera counter to 100:
Operation Key to hit
--------- ----------
---
RES CAM | 6 | Then type: 100 [Enter]
---
WINDOFF WITH SHUTTER CLOSED
---------------------------
The following shows how to cap the shutter, windoff some frames on
the camera, then open the shutter again:
Operation Key to hit
--------- ----------
---
CLS | = |
---
Then:
----
CAM FWD | F9 | (Camera runs while F9 pressed)
----
Then:
---
OPN | - |
---
Windoff 100 frames on the camera, shutter automatically caps:
Operation Key to hit
--------- ----------
-----------
SEEK | BACKSPACE | Then type: 100 [Enter]
-----------
Windoff camera out to frame #304, shutter automatically caps:
Operation Key to hit
--------- ----------
-----------
SEEK | BACKSPACE | Then type: >304 [Enter]
-----------
Send aerial to frame #200, main to #100, and windoff 50x on camera:
Operation Key to hit
--------- ----------
-----------
SEEK | BACKSPACE | Then type: >200 [Space] >100 [Space] 50 [Enter]
-----------
STRAIGHT PRINTS
---------------------------
For a 1:1 step print with ONLY main projector (single projector system):
Operation Key to hit
--------- ----------
---
RAT | 3 | Then type: 1 [Space] 1 [Enter]
---
Then:
---
REP+ | 1 |
---
..same thing, but on an aerial system:
Operation Key to hit
--------- ----------
---
RAT | 3 | Then type: 0 [Space] 1 [Space] 1 [Enter]
---
Then:
---
REP+ | 1 |
---
For a 1:1:1 step print on an aerial system:
Operation Key to hit
--------- ----------
---
RAT | 3 | Then type: 1 [Space] 1 [Space] 1 [Enter]
---
Then:
---
REP+ | 1 |
---
STEP PRINTS
---------------------------
For a 2:1 step print:
Operation Key to hit
--------- ----------
---
RAT | 3 | Then type: 2 [Space] 1 [Enter]
---
Then:
---
REP+ | 1 |
---
For a 2:2:1 step print:
---
RAT | 3 | Then type: 2 [Space] 2 [Space] 1 [Enter]
---
Then:
---
REP+ | 1 |
---
FADES/DISSOLVES
---------------------------
For a 24 frame fade in on a held projector frame:
Operation Key to hit
--------- ----------
---
FDI | 7 | Then type: 24 [Enter]
---
Then:
----
CAMERA FWD | F9 |
----
For a 24 frame fade in on a straight print, make sure your
ratio is currently 1:1 (See STRAIGHT PRINTS) then:
Operation Key to hit
--------- ----------
---
FDI | 7 | Then type: 24 [Enter]
---
Then:
---
REP+ | 1 |
---
(REVISION 3.00 OR LATER)
To set up a fade in, hit the FADE IN button, and enter the number of frames
for the fade. When you run the camera, the fade will take place. Fade outs
and dissolves are set up the same way. You can cancel a fade by hitting
the FADER OPEN or FADER CLOSE buttons.
NOVICE'S GUIDE TO DOS COMMANDS
------------------------------
Note that to run a DOS command, you should precede the command
with a '!' when you are in the OPCS software. Or, if you prefer,
you can set up more DOSCMD(OPCSDEFS) entries in your OPCSDEFS.OPC
file so you can type in certain DOS commands without the need for
using '!'.
*** Formatting Floppy Disks *****************************************
format a:
Be careful with the DOS 'format' command.. If you dont supply any
arguments to format, it will often default to formatting the
hard disk! An easy mistake to make.
*** Directory Listings **********************************************
The DIR command is how to get directory listings:
dir # list files in the current directory
dir *.run # list files that end in .run
dir m*.* # list all files that start with 'm'
dir ilm/scn4a/*.* # list all files in the ilm/scn4a directory
dir a: # list files on floppy drive
Most versions of DOS support sorting of file listings.
Dos 6.0 supports these:
dir /on # sort by name
dir /ox # sort by extension
dir /od # sort by date (oldest first)
dir /os # sort by size
See 'dir /?' for a list of all the options dir supports.
COPY FILES
----------
The copy command has two arguments: a source and a destination.
If the destination is not supplied, the current drive is assumed
to be the destination.
copy *.run a: # copy files ending in .run to floppy
copy a:*.run . # copy files ending in .run FROM floppy
copy myfile.pos save.pos # make a copy of myfile.pos to save.pos
DELETE FILES
------------
When you delete files, they don't come back, so BE CAREFUL.
Especially BE CAREFUL WHEN DOING WILDCARD DELETES!
del junk.pos # deletes 'junk.pos' from disk
del a:crap.jnk # deletes crap.jnk from floppy disk
del crap*.* # deletes files that start with 'crap'
del *.* # deletes ALL FILES - Watch out!
MAKING SUB DIRECTORIES
----------------------
mkdir fred # makes a subdir 'fred' in the current dir
mkdir fred\jobs # makes a subdir 'jobs' in 'fred'
mkdir a:save # makes a 'save' subdir on the floppy
CHANGING INTO/OUT OF SUBDIRECTORIES
-----------------------------------
cd fred # go into 'fred' directory
cd jobs # go into 'jobs' directory
cd .. # go back one to 'fred'
cd # tells you what directory you are in
REMOVING SUB DIRECTORIES
------------------------
del fred\job\*.* # clean out JOB directory of all files first
rmdir fred\job # removes JOB directory (FRED remains)
rmdir fred # removes FRED directory
SEARCHING FOR FILES
-------------------
The 'whereis' command will search the entire hard disk for filenames you supply
as an argument, and shows the full pathname to any matching files. Examples:
whereis opcsdefs.opc # searches for all OPCSDEFS.OPC files
whereis foo*.* # searches for all files starting with "foo"
HARD DISK BACKUPS
-----------------
You should definitely refer to your DOS manual for this one.
See the docs on BACKUP and RESTORE commands. But here are a
few examples:
HOW TO BACKUP THE C: DRIVE
--------------------------
mkdir a:\opcs
xcopy /s c:\opcs a:\opcs
HOW TO RESTORE THE C: DRIVE FROM BACKUPS
----------------------------------------
cd \
mkdir \opcs
xcopy /s a:\opcs c:\opcs a:
LOOKING AT TEXT FILES
---------------------
type myfile.pos # Type out myfile.pos in one blast
more myfile.pos # View the file a page at a time
HOW TO EDIT THE HIDDEN C:\MSDOS.SYS FILE
----------------------------------------
The MSDOS.SYS file lets you disable Windows 95/Windows 98 from starting,
so you can boot straight into DOS. But to edit the file, you have to turn
off its hidden system attributes, then turn them back on when done:
attrib -S -H -R c:\msdos.sys # Remove system/hidden/readonly
edit c:\msdos.sys # Edit file, make changes
attrib +S +H +R c:\msdos.sys # Restore system/hidden/readonly
The recommended contents of the MSDOS.SYS file to ensure only DOS boots
(and not Windows) for OPCS is:
;FORMAT
[Options]
BootGUI=0
Logo=0
BootDelay=0
OPCS BOOT INSTALL
This text describes the boot process for OPCS, when the machine
starts up. This assumes general familiarity with IBM PCs and
DOS terminology.
It is assumed you have:
o An IBM PC with ISA or EISA slots
o An RTMC card or A800 card plugged into one of the ISA slots
o 512K or more of system memory.
o A hard disk with MS-DOS 6.xx, Win95, or Win98 installed
o For Win95/Win98: configured to boot into DOS mode (BootGUI=0)
o AUTOEXEC.BAT and CONFIG.SYS configured as described below
CONFIG.SYS
----------
Your C:\CONFIG.SYS should at minimum have these (or similar) settings:
DEVICE=C:\WINDOWS\HIMEM.SYS
DEVICE=C:\WINDOWS\COMMAND\ANSI.SYS
DEVICE=C:\OPCS\BIN\OPCSBOLD.SYS
FILES=10
BUFFERS=20
HIMEM.SYS is optional but recommended.
ANSI.SYS is required but might be in a different directory.
Values for FILES/BUFFERS are minimum.
OPCSBOLD.SYS is required if 'nixie' counters are used.
AUTOEXEC.BAT
------------
Your C:\AUTOEXEC.BAT should have at minimum these settings:
set PATH=\OPCS\BIN;%PATH%
set MANPATH=C:/OPCS/MAN/MAP
..and at least one of the following drivers should be started,
depending on which stepper motor pulse generator card you have
installed in the machine's ISA slot:
A800DRV.COM - for the a800 card
RTMC48.COM - for the RTMC48 or Kuper Industrial card
MDRIVE.COM - for the RTMC16 card
If started with no command line flags, the drivers assume
the cards are using the default jumper settings (usually
baseaddr=300, IRQ=5).
If your jumper settings are different than the defaults, be sure
to specify the appropriate command line options that match your
card's jumper settings.
Invoke the driver with the "-help" flag to see the driver's command
line options, e.g.
a800drv -help
rtmc48 -help
mdrive -help
If a driver doesn't show a help screen, that driver ONLY supports
the default jumper settings.
For example, if your A800 card has default settings, you can just put:
a800drv
..in your AUTOEXEC.BAT.
If, however, your A800 card has the BaseAddr set to 340, instead
of the default 300, then you'd have to start the driver with:
a800drv -b340 -i5
| |
| IRQ5
BaseAddr 340
ORIGIN
Gregory Ercolano, Topanga, California 04/12/00